主题
VitePress 建站资源汇总
整理下使用 VitePress 搭建博客过程中使用过的一些资源和方案
主要参考站点
VitePress快速上手中文教程,这个站点扩展很全,包括静态部署选择,样式美化,第三方插件等,都是手把手教程,很细
XaviDocs个人技术文档,借鉴了部分 VitePress 的使用经验
VitePress主题 vitepress-theme-async 源码,借鉴了部分对 VitePress 的配置和操作逻辑,阅读这些代码对你理解 VitePress 会有很大帮助
晚阳Crown,借鉴了使用 Cloudflare R2 搭建图床以及使用 Cloudflare 管理域名的经验
基础配置和样式美化
暗黑模式切换动画
参考 https://note.weizwz.com/vitepress/basic/dark-animation
链接前加图标
参考 https://note.weizwz.com/vitepress/basic/link-icon
优化代码块为mac风格
参考 https://note.weizwz.com/vitepress/basic/code-block
使用 DocSearch 搜索
官方教程 https://vitepress.dev/zh/reference/default-theme-search#algolia-search
详细教程 https://vitepress.yiov.top/docsearch.html
点击查看我的配置
ts
import type { DefaultTheme } from 'vitepress'

export const algolia: DefaultTheme.AlgoliaSearchOptions = {
  appId: "appid",
  apiKey: "apikey",
  indexName: 'weizwz',
  placeholder: '搜索文档',
  translations: {
    button: {
      buttonText: '搜索文档',
      buttonAriaLabel: '搜索文档'
    },
    modal: {
      searchBox: {
        resetButtonTitle: '清除查询条件',
        resetButtonAriaLabel: '清除查询条件',
        cancelButtonText: '取消',
        cancelButtonAriaLabel: '取消'
      },
      startScreen: {
        recentSearchesTitle: '搜索历史',
        noRecentSearchesText: '没有搜索历史',
        saveRecentSearchButtonTitle: '保存至搜索历史',
        removeRecentSearchButtonTitle: '从搜索历史中移除',
        favoriteSearchesTitle: '收藏',
        removeFavoriteSearchButtonTitle: '从收藏中移除'
      },
      errorScreen: {
        titleText: '无法获取结果',
        helpText: '你可能需要检查你的网络连接'
      },
      footer: {
        selectText: '选择',
        navigateText: '切换',
        closeText: '关闭',
        searchByText: '搜索提供者'
      },
      noResultsScreen: {
        noResultsText: '无法找到相关结果',
        suggestedQueryText: '你可以尝试查询',
        reportMissingResultsText: '你认为该查询应该有结果?',
        reportMissingResultsLinkText: '点击反馈'
      }
    }
  }
}功能扩展
添加图片查看器 Fancybox
Fancybox 是一款非常流行且功能强大的 JavaScript 图片查看库
集成参考 https://note.weizwz.com/vitepress/extend/vitepress-fancybox
添加不蒜子统计
参考 https://note.weizwz.com/vitepress/extend/busuanzi
文章统计,自定义首页,归档页,标签页
参考 https://note.weizwz.com/vitepress/extend/post-data
其他参考资料:
部署相关
静态部署
部署到 GitHub Pages ,参考文章
https://vitepress.yiov.top/assets.html#部署
基本流程: 项目根目录建立文件 .github/workflows/main.yml,增加自动部署配置,代码提交, GitHub 监测到工作流后自动执行。
点击查看我的配置
yml
# 将静态内容部署到 GitHub Pages 的简易工作流程
name: Deploy static content to Pages

# env:
#   VERCEL_ORG_ID: ${{ secrets.VERCEL_ORG_ID }}
#   VERCEL_PROJECT_ID: ${{ secrets.VERCEL_PROJECT_ID }}

on:
  # 仅在推送到默认分支时运行。
  push:
    branches: ['main'],暂停部署到 GitHub pages

  # 这个选项可以使你手动在 Action tab 页面触发工作流
  workflow_dispatch:

# 设置 GITHUB_TOKEN 的权限,以允许部署到 GitHub Pages。
permissions:
  contents: read
  pages: write
  id-token: write

# 允许一个并发的部署
concurrency:
  group: 'pages'
  cancel-in-progress: true

jobs:
  # 构建
  build:
    runs-on: ubuntu-latest
    steps:
      - name: Checkout
        uses: actions/checkout@v4
        with:
          persist-credentials: false
          fetch-depth: 0
  # github page deploy
      - name: Set up pnpm
        uses: pnpm/action-setup@v4
        with:
          version: 9
      - name: Set up Node
        uses: actions/setup-node@v4
        with:
          node-version: 20
          cache: 'pnpm'
      - name: Setup Pages
        uses: actions/configure-pages@v4
      - name: Install dependencies
        run: pnpm install
      - name: Build
        run: pnpm run build
      - name: Upload artifact
        uses: actions/upload-pages-artifact@v3
        with:
          # Upload dist repository
          path: './dist'

  # 部署
  deploy:
    environment:
      name: github-pages
      url: ${{ steps.deployment.outputs.page_url }}
    needs: build
    runs-on: ubuntu-latest
    name: Deploy
    steps:
      - name: Deploy to GitHub Pages
        id: deployment
        uses: actions/deploy-pages@v4

      # vercel deploy
      # - name: Restore file modification time 🕒
        # run: find docs/post -name '*.md' | while read file; do touch -d "$(git log -1 --format="@%ct" "$file")" "$file"; done
        # run: "git ls-files -z | while read -d '' path; do touch -d \"$(git log -1 --format=\"@%ct\" \"$path\")\" \"$path\"; done"
      # - name: Install Vercel-cli🔧
      #   run: npm install --global vercel@latest
      # - name: Pull Vercel Environment Information
      #   run: vercel pull --yes --environment=production --token=${{ secrets.VERCEL_TOKEN }}
      # - name: Build Project Artifacts
      #   run: vercel build --prod --token=${{ secrets.VERCEL_TOKEN }}
      # - name: Deploy Project Artifacts to Vercel
# run: vercel deploy --prebuilt --prod --token=${{ secrets.VERCEL_TOKEN }}这个配置,也是可以部署到 Vercel 的,注释掉 github-pages 部分,放开后面的 vercel deploy 部分即可。需要注意构建命令和输出目录,原始构建命令为 npm run docs:build,输出目录 docs/.vitepress/dist
添加 Github Giscus 评论系统
Github Giscus 的好处简单易用,限制的地方在于需要仓库公开,代码必须托管在 Github 上。可参考我的这篇文章
https://note.weizwz.com/vitepress/extend/vitepress-giscus
其他参考链接:
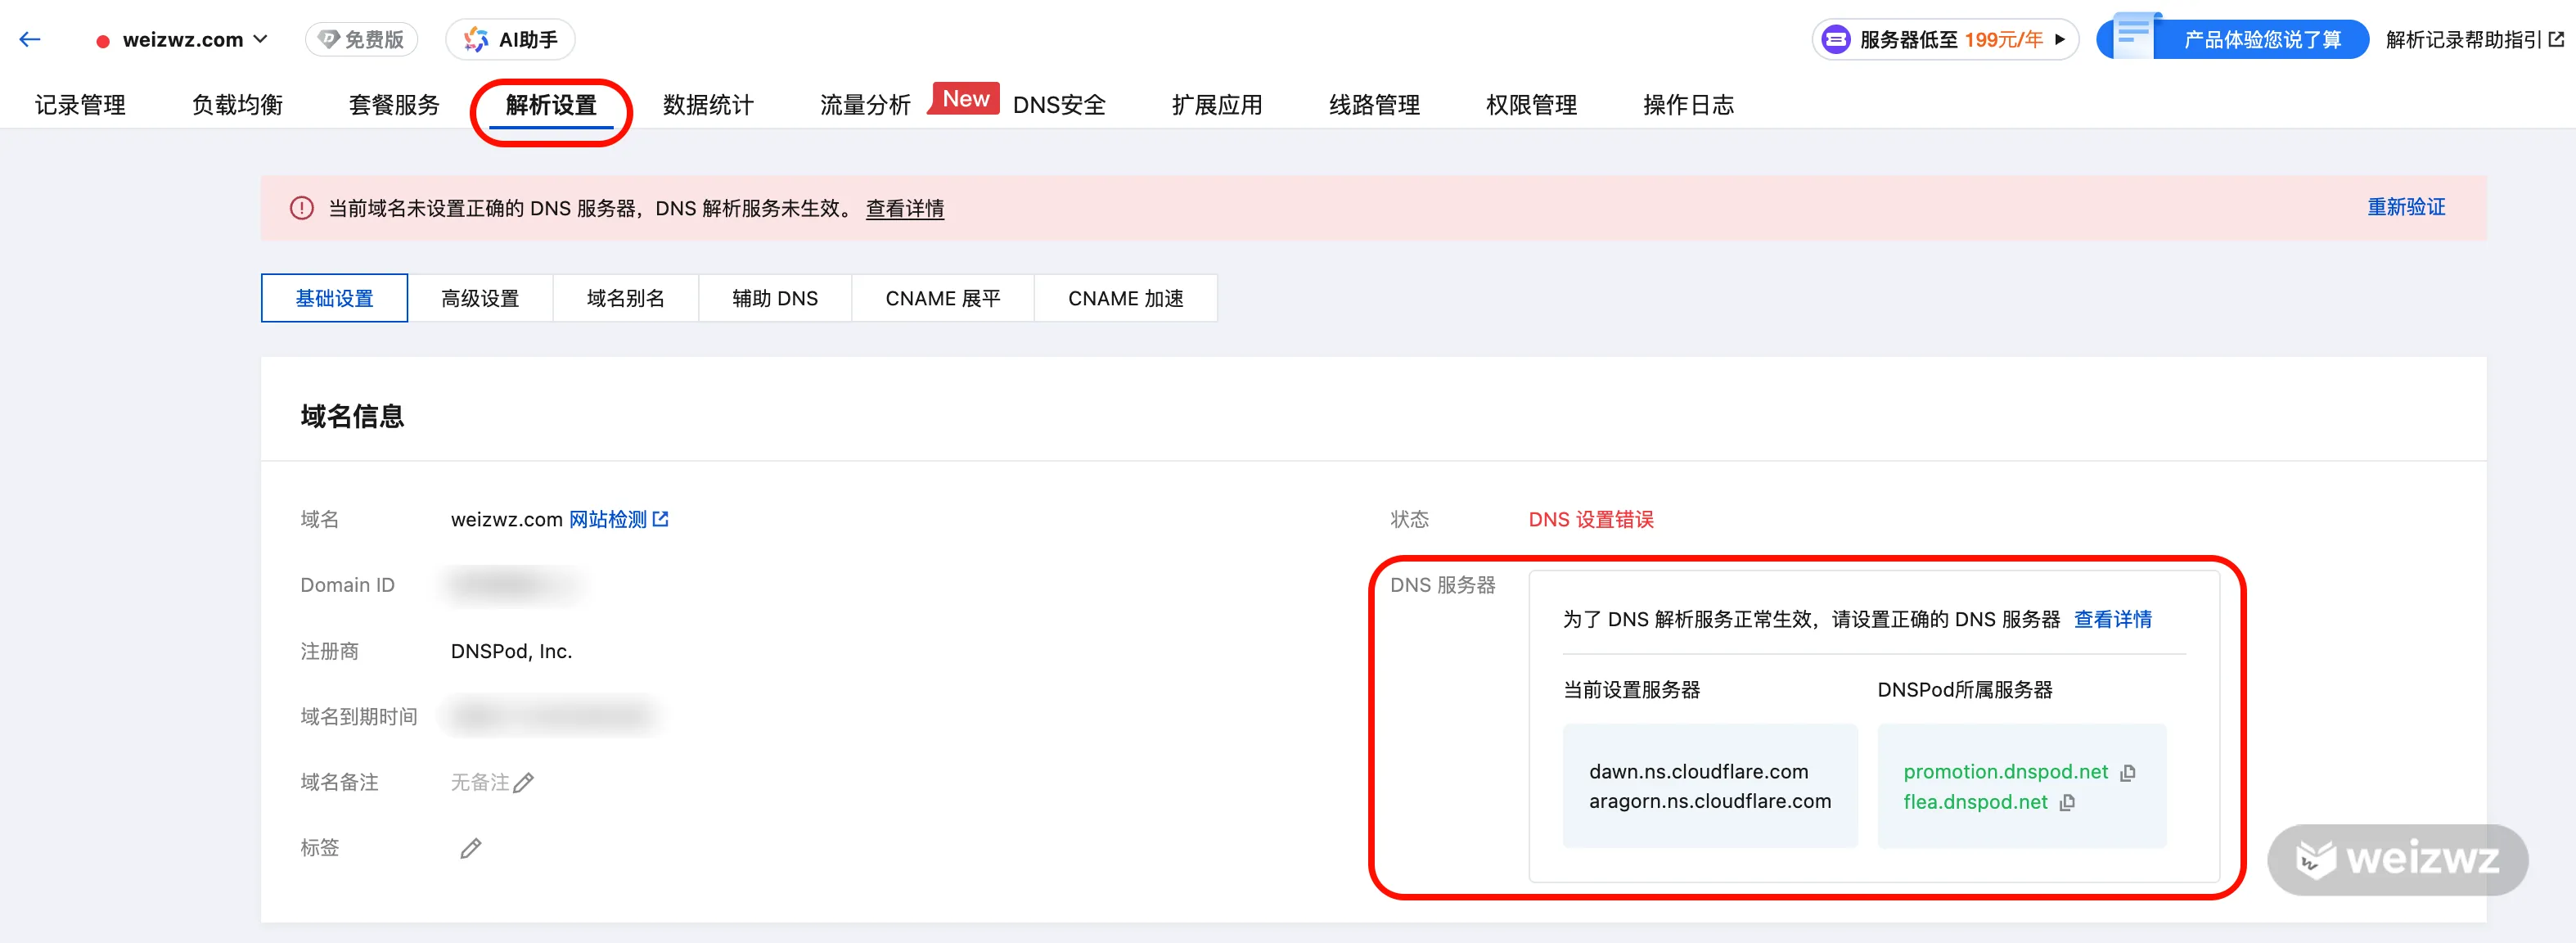
使用 Cloudflare 管理域名
参考这篇文章
https://www.oneyangcrown.top/posts/cloudflare-hosted-domain-cdn-ssl-guide/
如果你的域名在阿里云或者腾讯云,找到域名解析,修改DNS服务器地址为 Cloudflare 上的即可
使用 Cloudflare R2 配置图床
参考这篇文章,先配置 R2,然后使用自定义域名。
https://www.oneyangcrown.top/posts/cloudflare-r2-free-image-hosting-guide/
注意,配置过程中创建的 API令牌,访问密钥等,需要我们储存起来,方便后续在 PicList 中使用;
第二个需要注意的是,图床我们一般使用 子域名。比如,你在 Cloudflare 上管理的域名为 weizwz.com,R2 的自定义域名你可以输入 p.weizwz.com,然后 Cloudflare 会自动给你添加 子域名解析,实在是在贴心了。

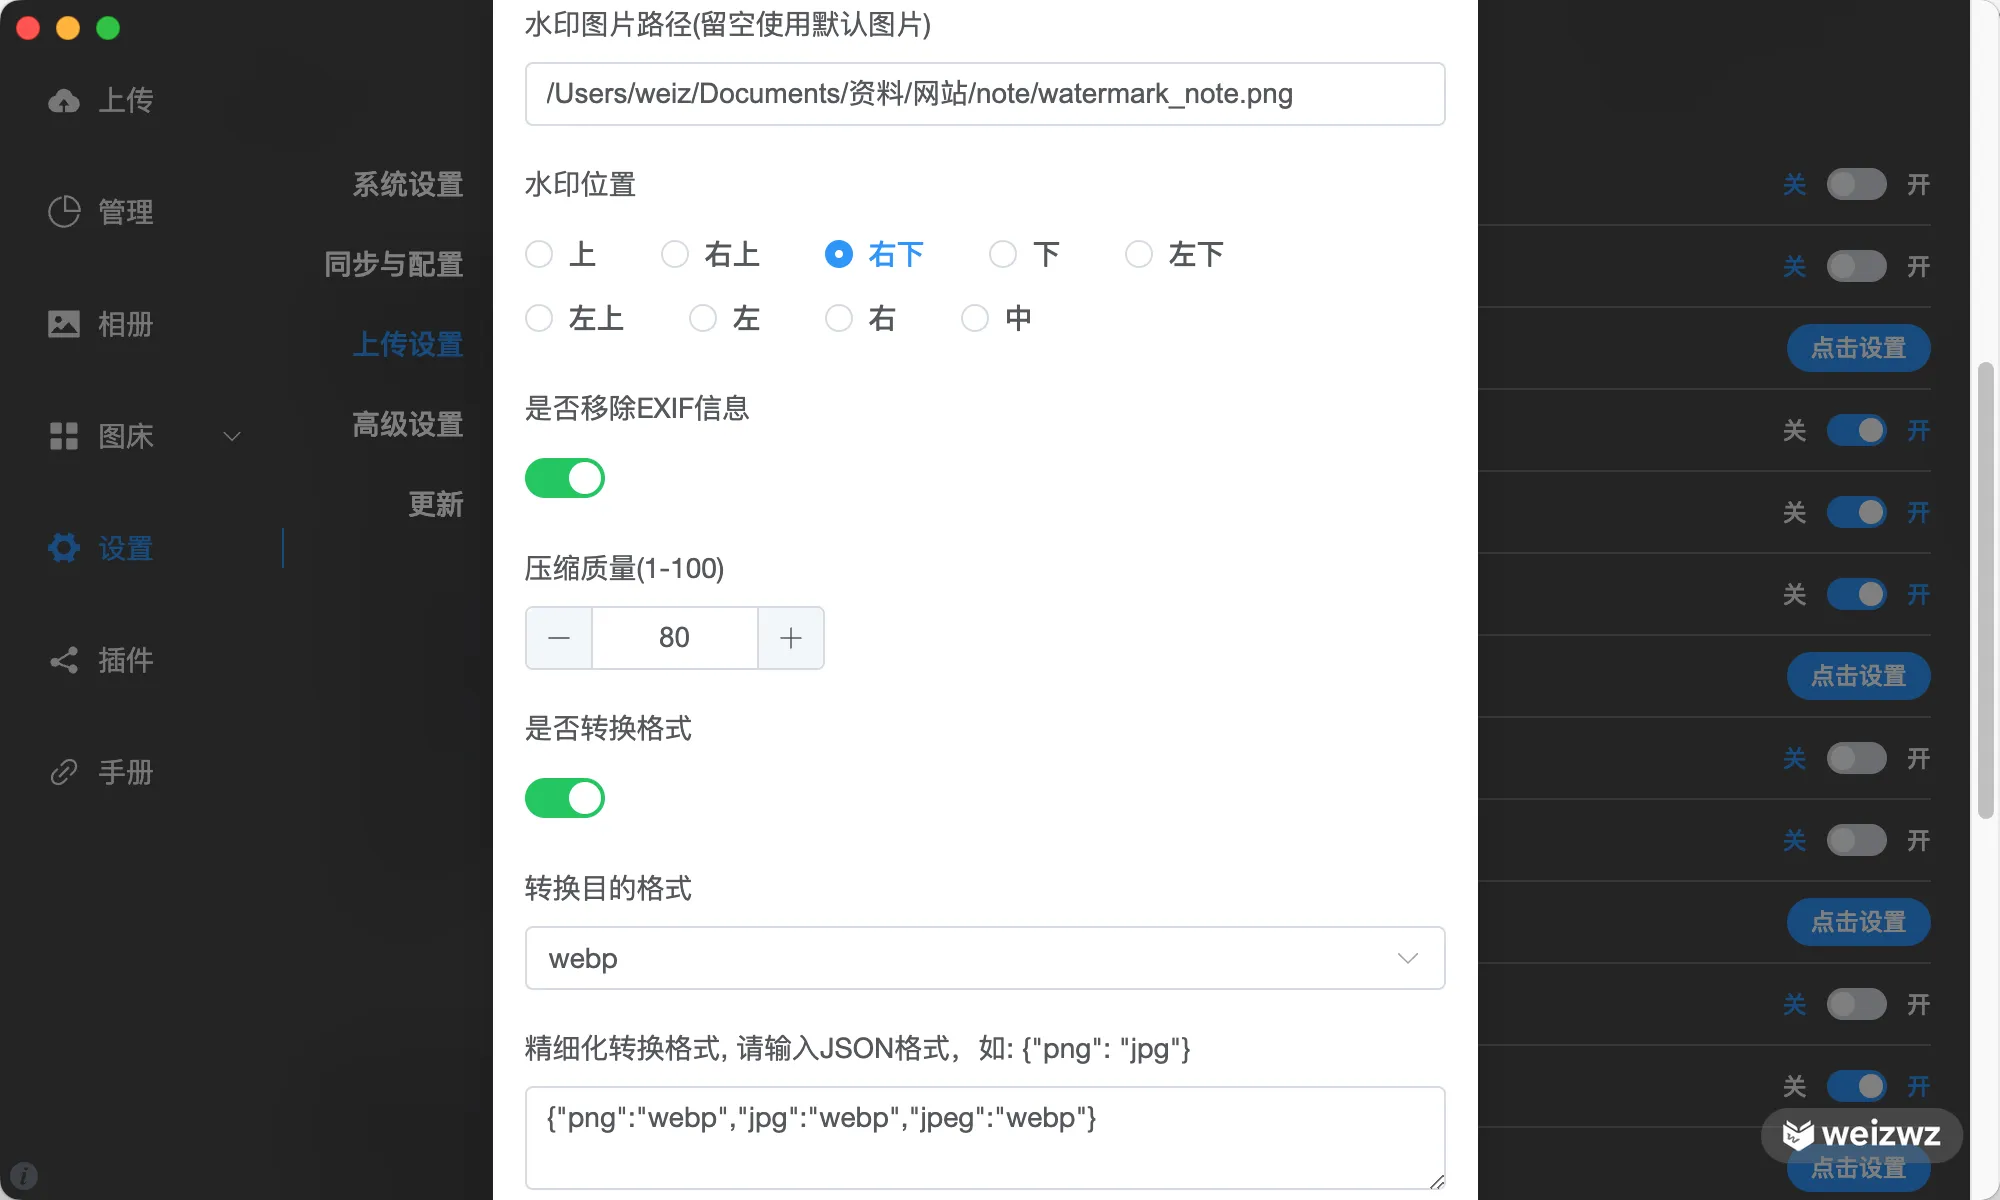
关于图床API的使用,就是上传和删除等操作,这里建议使用工具 PicList,官网文档很详细,包括下载和配置等
由于我们使用的是 Cloudflare R2,重点查看这里 PicList 内置AWS S3 配置
上传配置里,我们可以设置水印,上传时压缩图片,还有图片转换为 webp 格式,进一步减小图片体积
还可以上传配置到代码仓,方便切换设备后同步配置。在 github/gitee/gitea 中创建一个私有仓库,然后将 PicList 配置上传,参考 设置配置同步 。
配置同步需要的 GitHub Token,点击 GitHub 上的个人头像,Settings,拉到最下面点击 Developer settings,然后会跳转到新界面,按下图创建

创建好后,复制 Token,粘贴到 PicList 配置里,然后就可以上传你的配置到仓库了。
使用 Cloudflare Pages 托管网站
参考这篇文章
https://www.oneyangcrown.top/posts/cloudflare-pages-deploy-hexo-blog-guide/
文章中的博客使用的是 Hexo 框架 不是 Vitepress,因此我们需要修改构建命令。VitePress 默认构建命令默认是 npm i && vitepress build docs,输入目录 docs/.vitepress/dist。
我对 VitePress 原始构建配置有修改,我的构建命令是 pnpm i && pnpm run build,构建输出 ./dist。如果你也有修改的话,需要修改为你自己的配置。这个配置在 package.json 中的 scripts 中可以看到。
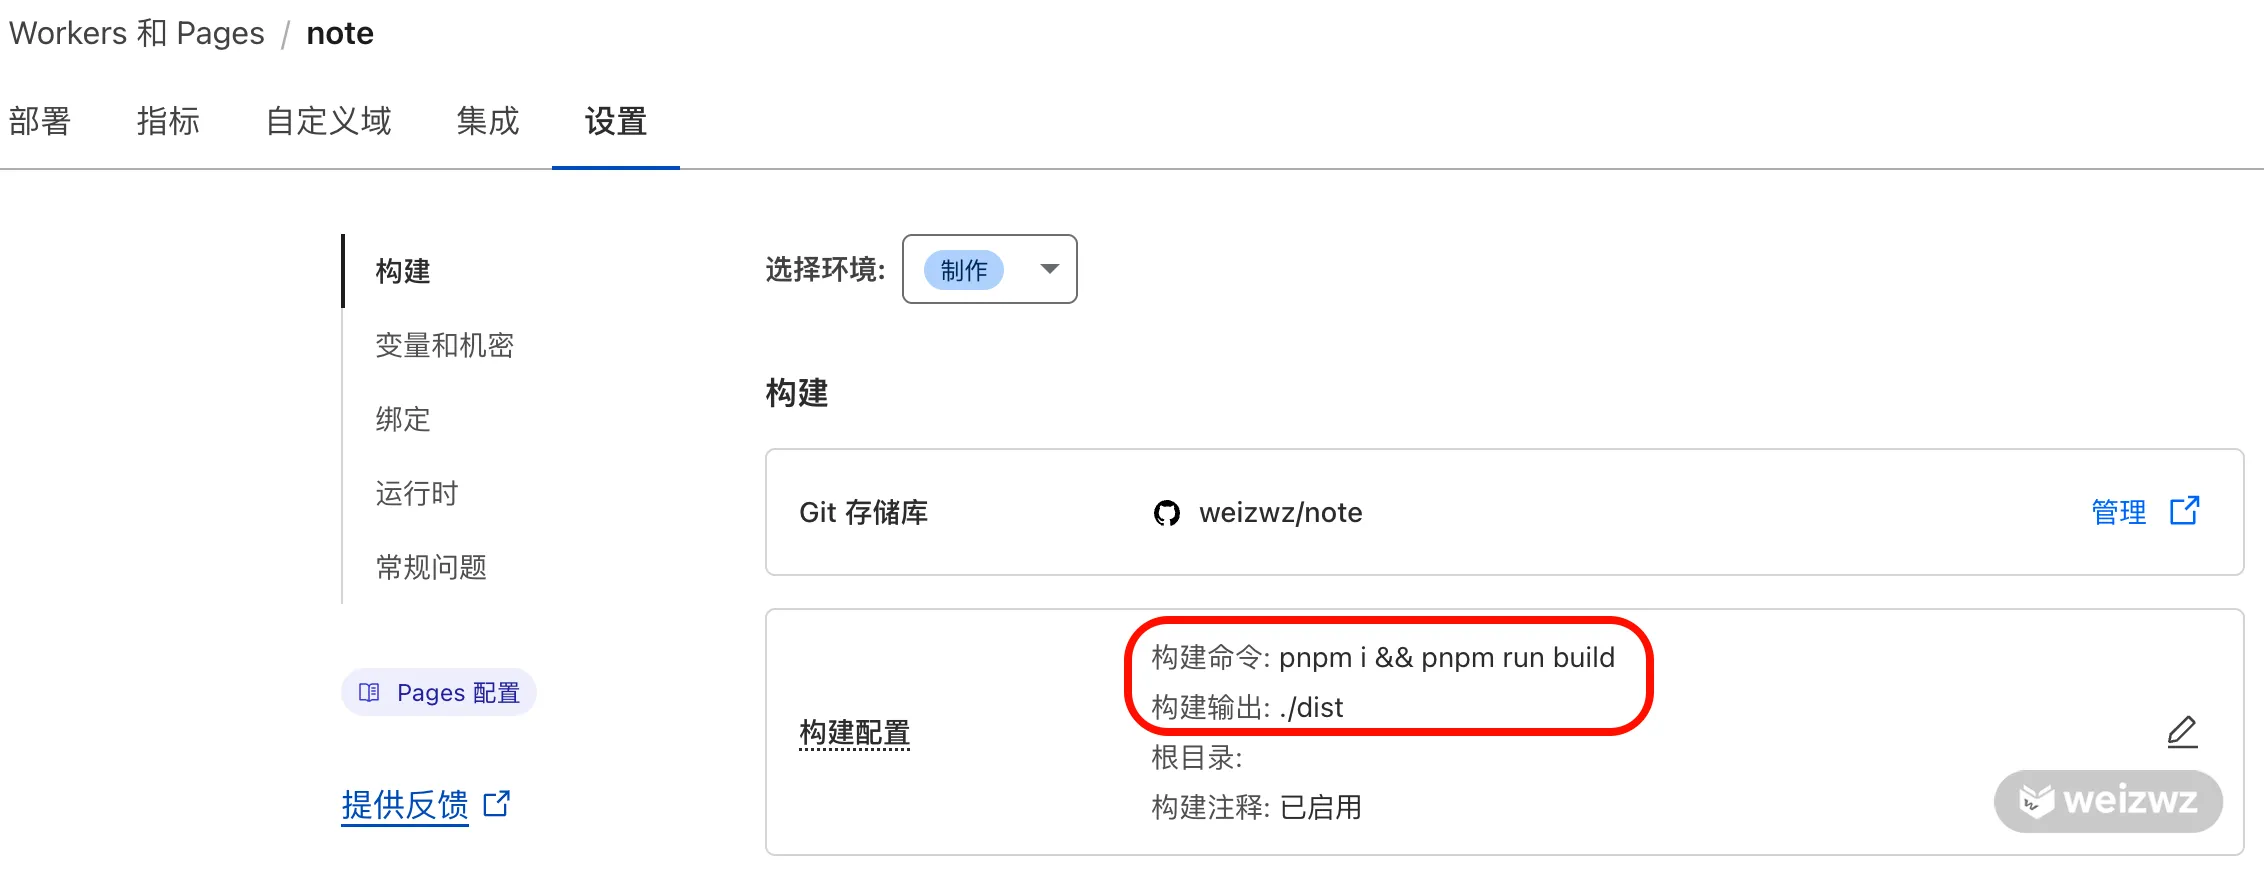
构建监听分支默认为主分支 main,当 main 分支有修改时,Cloudflare 将自动构建部署。
使用 Twikoo 评论系统
Twikoo 评论,需要部署前后端,包括数据库,操作略有复杂,但是不限制代码托管和服务托管,自定义程度更高
官方文档 https://twikoo.js.org/ ,非常详细,部署步骤如下:
1. 先建立 MongoDB Atlas 数据库
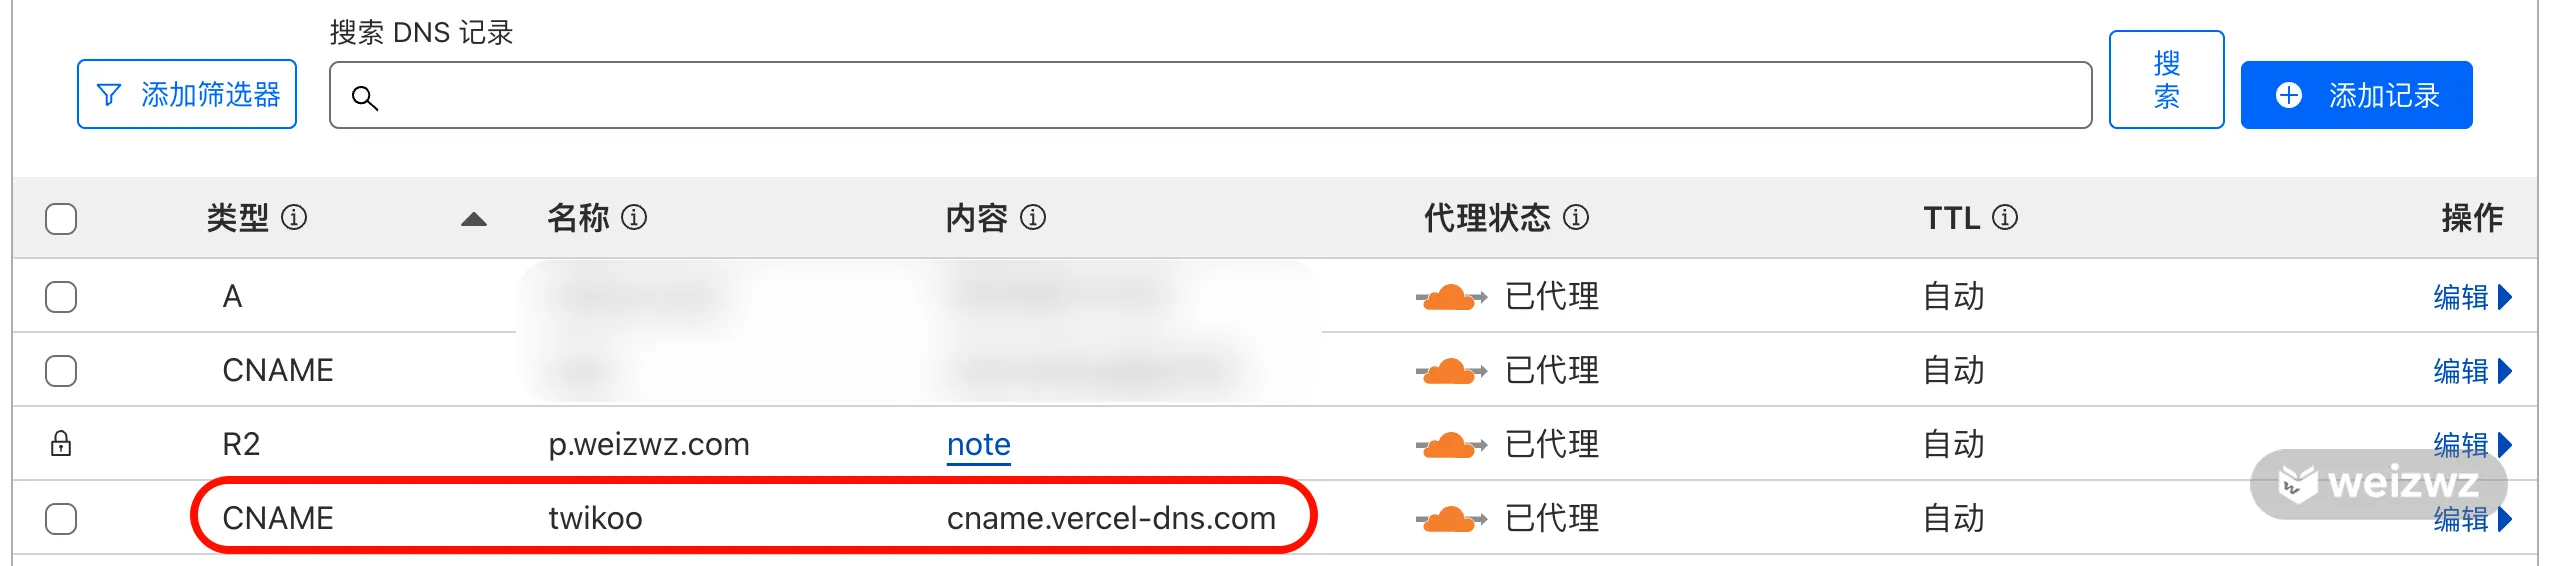
2. 然后选择云厂商部署,我这里选择的 Vercel 部署,因为操作相对简单,使用 Cloudflare workers 部署 限制较多,部署成功后,修改默认域名为你的子域名,需要去你的域名管理那上修改 DNS 解析。
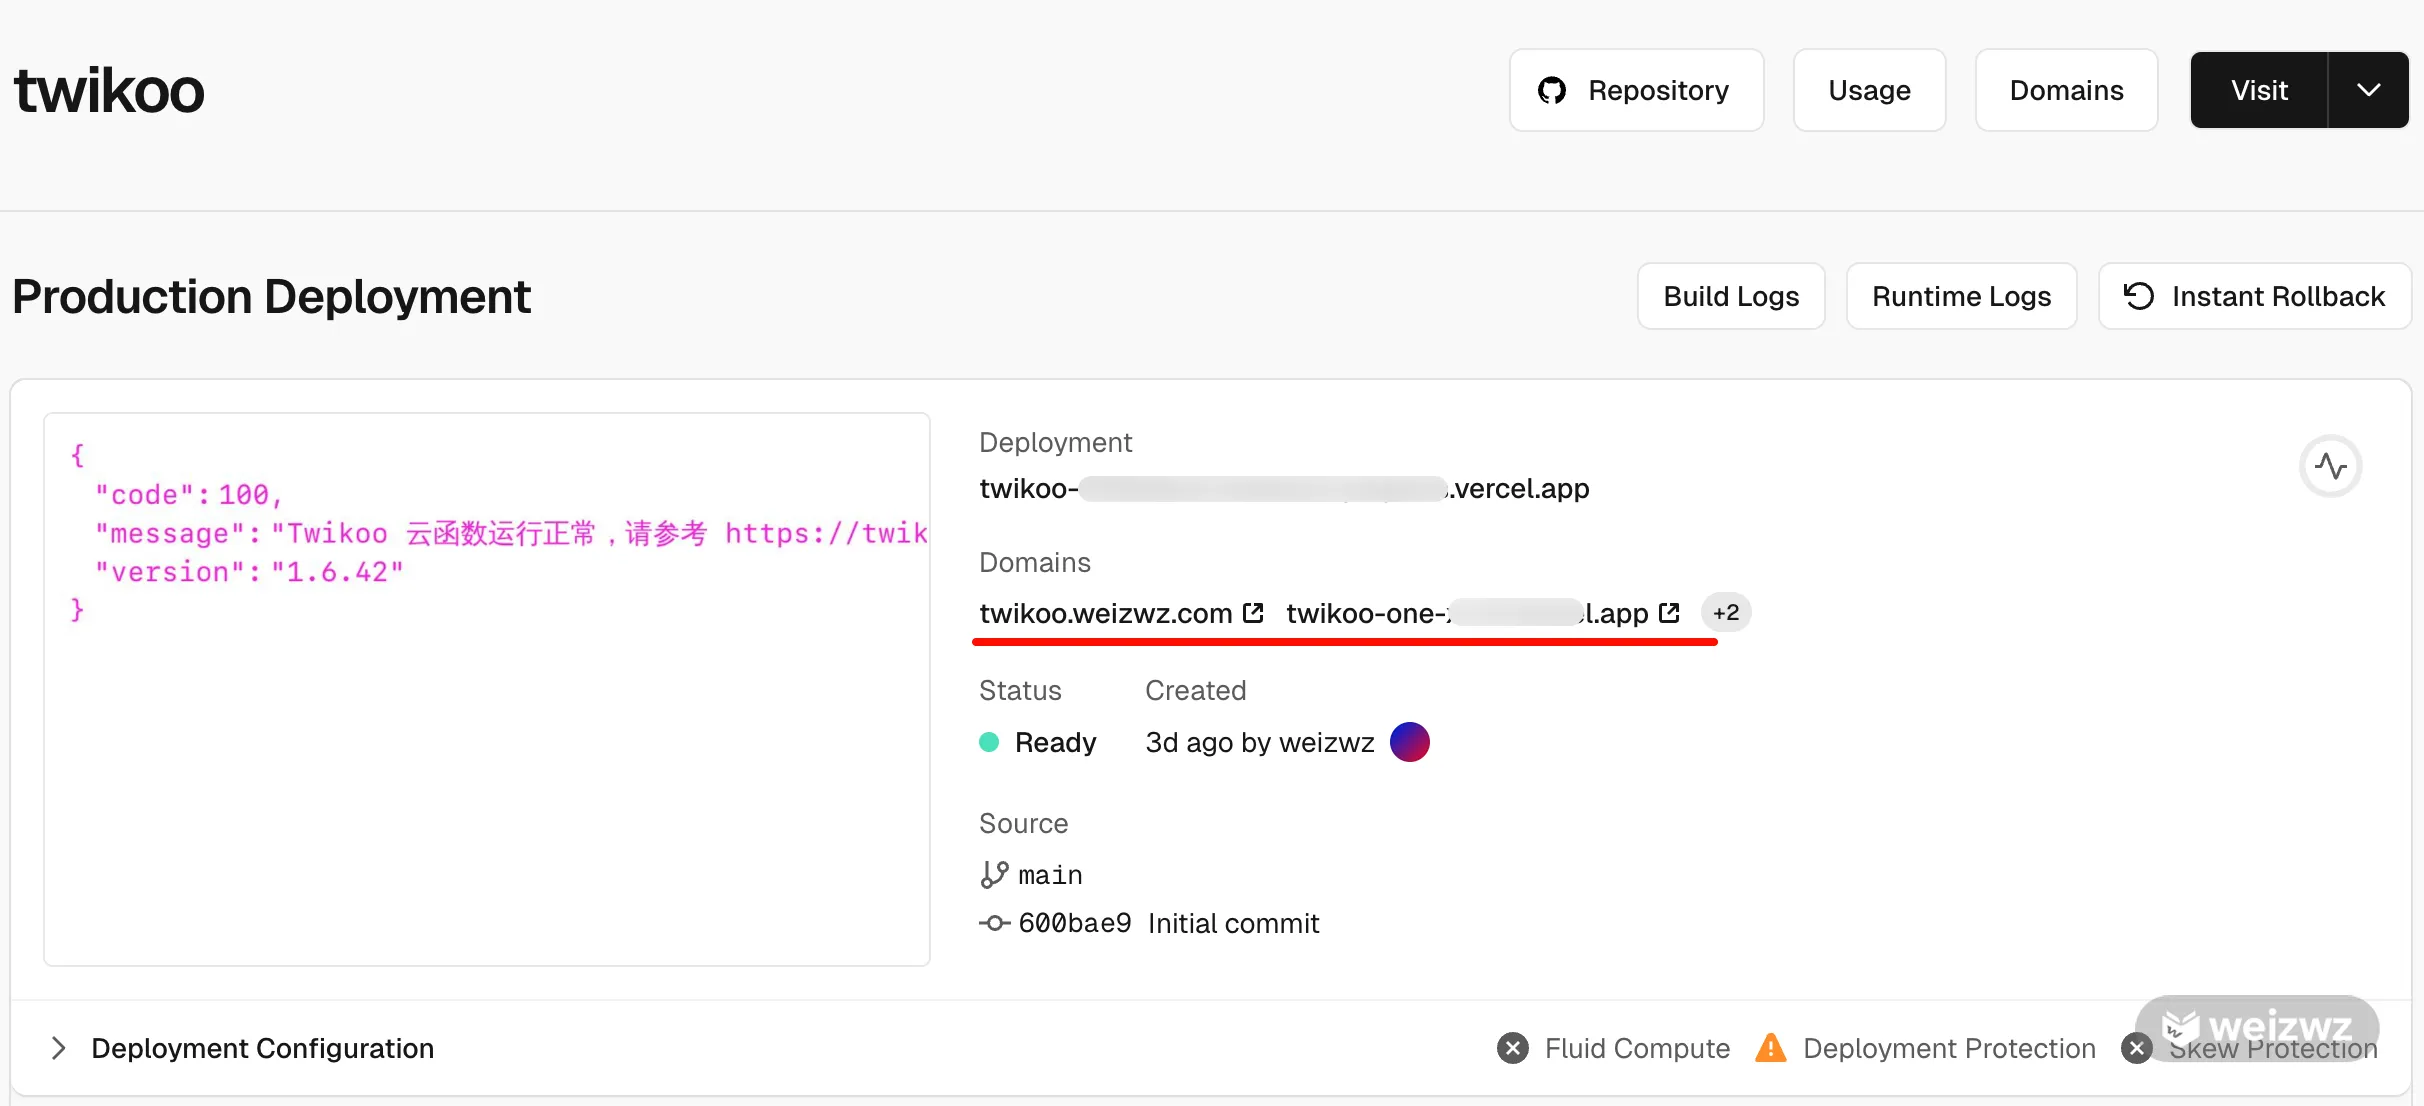
以 Cloudflare 为例,添加 CNAME 类型,子域名 twikoo,内容 cname.vercel-dns.com
3. 后端部署完成后,再集成到前端项目
修改我们的 VitePress 项目,参考这篇 VitePress 集成 Twikoo 评论
前端集成基本步骤:pnpm install twikoo -> 封装 Twikoo.vue 组件 -> 插入 Layout 插槽
4.配置邮件。前后端都处理好后,界面就能正常展示了,但是我们还要处理下邮件功能
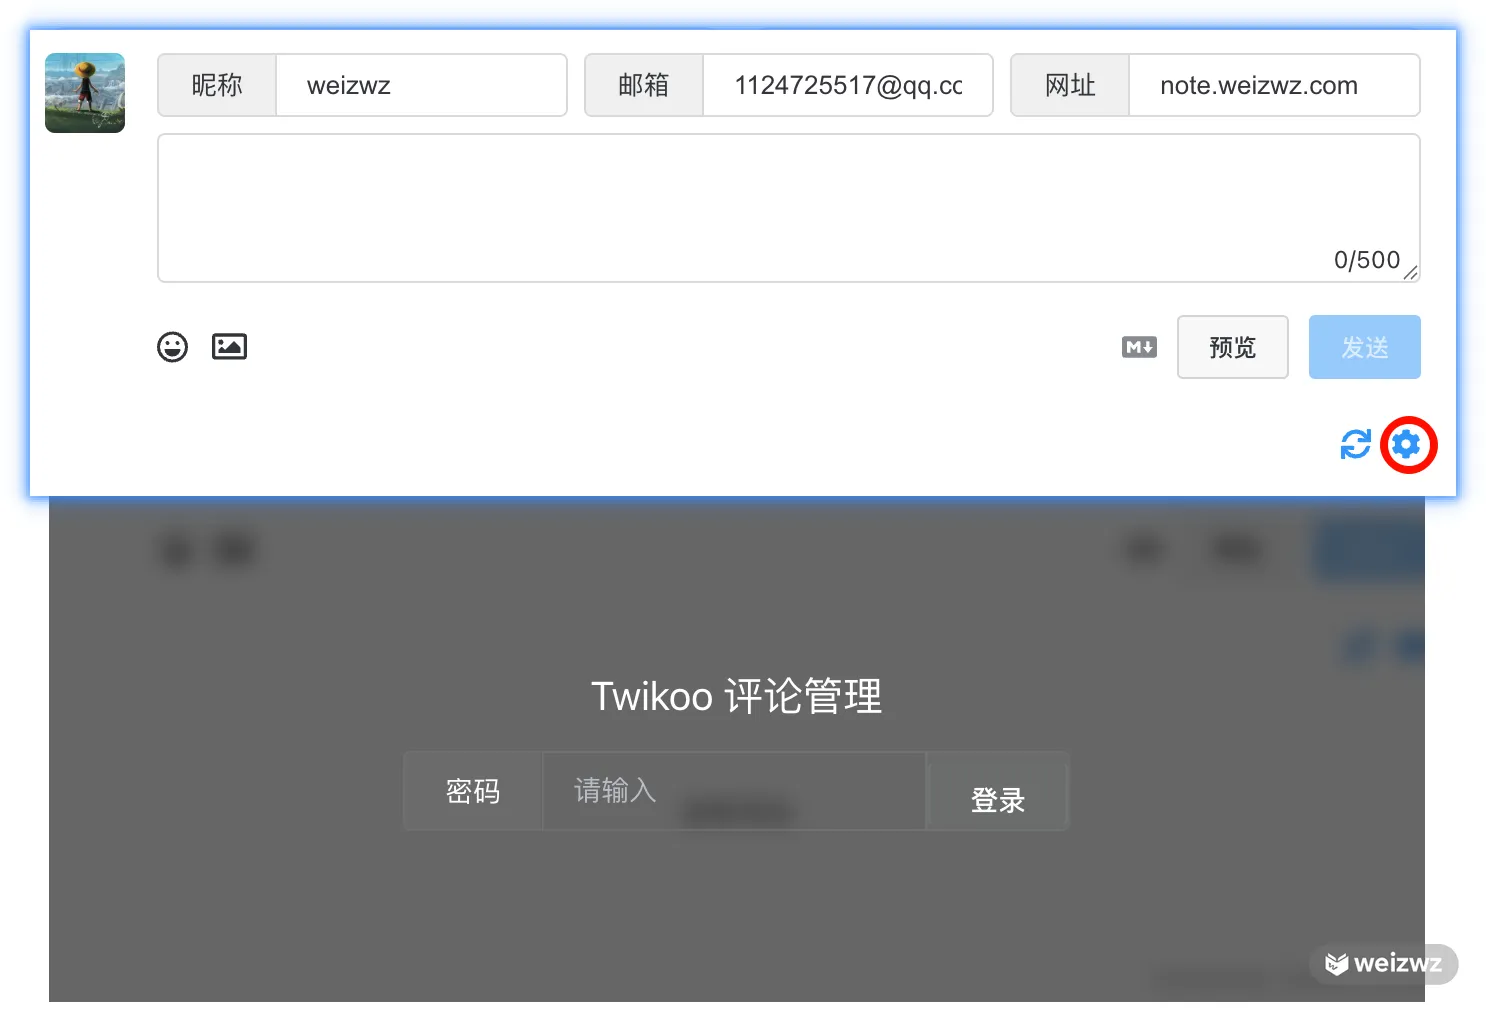
首次打开设置按钮后,会有设置密码框,设置一个复杂密码并记住。然后进入配置管理,选择邮件通知
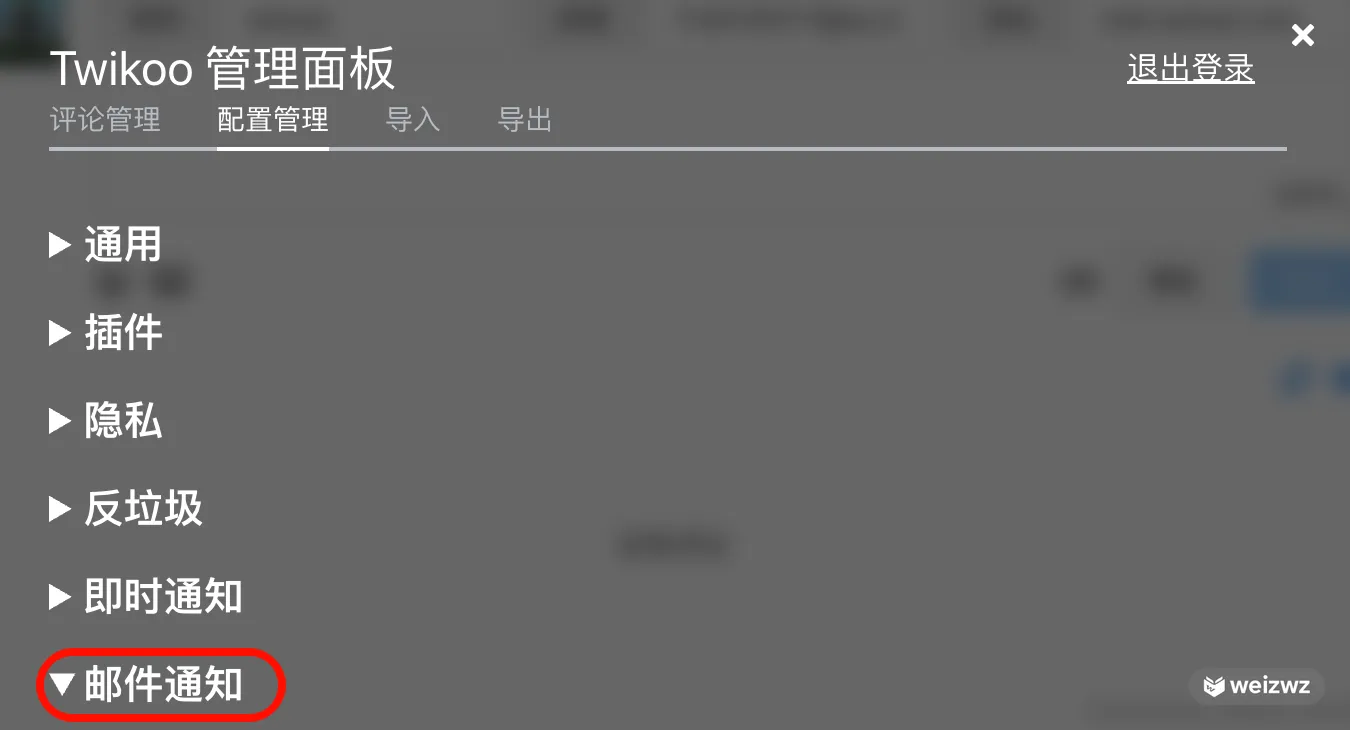
按照提示输入你的邮箱,邮箱授权码等即可。最后有个邮件测试,测试后,你能收到一封邮件,说明功能可用了